
My goal was to complete the quilt top last week, but there were two non-sewing days, due to other duties taking over. But I was able to work on it this weekend and just about 20 minutes ago I finished the last seam in the top. The top is all together!
Here's a little recap: The first step is to cut 2 1/2" (or 1 1/2") strips the width of the material. Sew one coloured strip to 4 beige strips. Make vertical cuts in this strip set into 2 1/2" strips (or 1 1/2" strips). Arrange them as show in the bottom right side of this photo. Snip each strip apart and sew back together in such a way that the coloured square moves from the upper left to the lower right, or vice versa.
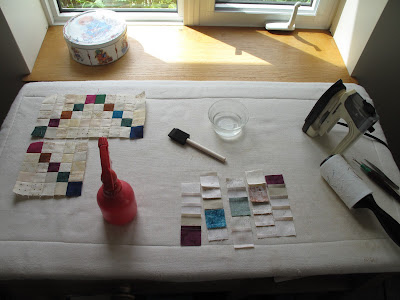


Here's a little recap: The first step is to cut 2 1/2" (or 1 1/2") strips the width of the material. Sew one coloured strip to 4 beige strips. Make vertical cuts in this strip set into 2 1/2" strips (or 1 1/2" strips). Arrange them as show in the bottom right side of this photo. Snip each strip apart and sew back together in such a way that the coloured square moves from the upper left to the lower right, or vice versa.

When you have four blocks, two ascending and two descending, sew them together in the arrangement shown. For half of this new block press the seams toward the center, for the other half press the seams outward from the center. When you sew the two halves together, you can open the intersection in the back allowing one half the seam to be pressed down and the other half of the seam to be pressed up. Carefully pressing all the blocks in the pattern means that when you sew the quilt together, ALL THE SEAMS WILL NEST!!! Nesting is important as it allows your points to be precisely together.

This shows the back of all the blocks arranged on the floor, prior to putting the top together. See how all the seams go in certain directions?

Now the quilt is ready for the blocks to be sewn together. In order to do that they all needed to be turned right-side up again. Pick up the blocks on the second-from-the-left vertical row and place them right sides together on top of the blocks in the first, left vertical row. Take them to the sewing machine and sew the right hand edges together. Do not snip the thread between the blocks. Repeat that with every two rows. Then go through that same process with your new double, vertical rows. By repeating this process, eventually you will have the entire quilt top sewed together, and none of the blocks will have moved "out of place."

It's not so obvious from the photo, but seeing the whole quilt together makes me realize that the proper colour for a border is brown. Tomorrow I'll go to the Fabric Nook and see if they still have any of the brown fabric that is already in this quilt. There are always other options, but I'm pretty sure brown is the way to go.
I'm still delighted with this quilt. It's SO DIFFERENT! My friend Susan has a long arm Quinique sewing machine and frame and she has offered to let me quilt it on that. I'm not sure that's what will happen, because I want the quilting to enhance the quilt, not detract from this unusual design. I'll keep you posted!
No comments:
Post a Comment