Friday, February 25, 2011

Two F.O's in One week!

Our town quilting club, the Pieceful Stitchers, keeps a supply of "comfort quilts" on hand to give to needy people: those who have suffered a house fire, a serious illness, a bereavement. The past few years all of these "comfort quilts" have been made by just two or three of our members. So when we were making up our schedule of meetings for this current year, we simply designated one of our meeting days: Comfort Quilts. In that way many members were involved in making a variety of comfort quilts.

Many of the quilts made this week Tuesday were made from a stash of blocks, strips and fabrics the club was given by the heirs of a deceased quilter. It was totally neat and surprising how combining these odd bits with some sashing and borders created lovely quilts.

Since we also had the option of bringing one of our own projects, I took along a "project bag" from my closet that contained eight picture blocks suitable for a man's lap quilt. I had bought them as a panel from the remnant bin a few years ago. This was a good opportunity to reduce that stash of "project bags."

I combined the pictures with some odds 'n ends of suitable material and came up with
lap quilt, 39" x 52", just right for a tall man in a wheel
chair, and certainly a very masculine quilt. Good! Objective accomplished, and one less project in my closet.

Wednesday morning I made the quilt sandwich and started machine quilting with a loose "meander" stitch. Finished it on Thursday, put on the binding and stitched the binding down to the back of the quilt. All Done!

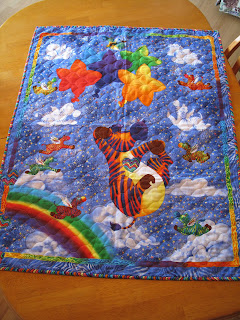
Then late on Thursday I picked up this cute, ready quilted panel from the pile. I had bought some great striped fabric for the binding that afternoon.

This panel had three holes where some rivets had been. I covered the three holes with some appliqued
stripey hearts. I decided to give the central "zebra" an appliqued heart also, just to tie things together.

So in a few hours I had another project finished. A lovely little comfort quilt for a child, bright and cheery.

So, in spite of having a rather long, boring main project to work on (see recent post on the 12-1/2" blocks), I am finding relief in a few short projects.

The one I'm working on at the moment: a cloth book from a panel. This one will take just a very short time to complete, and I can brag about finishing three projects in four days!

Sunday, February 20, 2011

A Gift

About two weeks ago I received a phone call from the quilt store where I bought three sewing machines in the last ten years: a Janome SchoolMate (a light machine for ease in travel to quilting groups), a Janome 6500 (a super nice machine!), and my latest, the wonderful "Horizon" with its 11 inch throat. They had a gift for me, and would hold it until I could pick it up.

Yesterday the weather was very cold, but clear and sunny, and we were able to go to Red Deer to pick up the "gift" and do a little shopping. I received a very fine wheeled tote for my Horizon, a box of 12 spools of good quilting cotton thread, and a new version of the 1/4" foot for the Horizon.

Today I was able to try out the new 1/4" foot, and I am delighted with it! I was having trouble sewing straight over intersections with my wonderful new machine. And the new version of the 1/4" foot totally solved that problem.

This is really important in my current project, which involves making at least thirty-eight 12-1/2" blocks for the sides and bottom of a quilt. Each block is made up of sixty-four 2" squares, so that's a lot of
intersections!

This photo shows my latest block in progress. It's laid out on my cutting table, next to the little June Taylor Cut n Press pad. I use the little travel iron for pressing small seams as I go, and each and every seam is pressed before sewing the next row. I give it a little spritz with a water bottle, and press the seam flat before pressing it to one side.

Underneath the cutting table you can just glimpse the new wheeled tote. I don't intend to take my Horizon out very often--because the SchoolMate is so
handy for that.

Here's one of the first blocks I put together and it's pretty helter-skelter. I was just making two patches, four patches, etc. Now that I've made a few more blocks, I'm getting a method down pat.

I usually find that as I progress through a project I find better ways of doing things.
I'm now sewing in horizontal rows, putting the squares together by twos, then by fours,
and finally, by eights. Then the horizontal rows are sewn together. I'm careful about which way I press each seam so that they nest nicely against each other.

I've decided never to rip out on these blocks, just to do my very best and accept how all the intersections turn out. Most are pretty satisfactory so far. And it's taking about one hour to complete the sewing on a block. There are ten blocks finished now.

There are lots of hours ahead working on this project, but I find that just doing it, block after block works. Kind of like putting one foot in front of the other on a long journey. Eventually you reach the end!

Friday, February 18, 2011

Blooming Flowers!

A real lift to the spirit: a pot of blooming daffodils! Of course, at this time of the year here, that's only indoors. I think down at the coast the daffodils have been blooming for a while. But we are still stuck in the depths of the winter. We don't need a groundhog here on Feb. 2 to tell us that we have at least six more weeks of winter to endure.

One of the reasons I chose this area of Alberta for our retirement is that the winter weather includes lots of sunshine. I do like the change of seasons, and having winter sunshine is important to me. However nice blooming flowers in February are, the winter sunshine is more important to me, especially when compared with the gloomy weather that milder, west coast climates experience in the winter months.

Jim started several pots of forced bulbs last fall, and now we can enjoy a variety of blooming plants indoors: amaryllis, daffodil, grape hyacinth, crocuses.


And here's the first bloom on the faith hibiscus, trimmed down to 6" before Thanksgiving. That plant is now about two feet high and ready to start into bloom again.

Another surprising addition to the indoor garden is this bud on the same "corn plant" that bloomed last fall. It's very unusual to have one of these bloom, and this is the third time for this particular plant, and the second time within one year. Just a huge surprise to me.

When this plant blooms, it sends out a powerful aroma at night. I find I have to move it into the sewing room to avoid the irritation of that strong scent in the living room while we are relaxing and reading there in the evening.

We have two other "corn plants," another in the living room and one in the bedroom. They have never bloomed, which makes me wonder if these are plants that are either male or female. Anybody have any experience with blooming "corn plants"?

After finishing two projects in January, I did start two new ones: the handquilted baby blanket that I pictured earlier, and then last week one of the heart table toppers that I've made so many of. This one went to a dear friend whom I visited for two days last week. I also made her young boys, great favorites of mine, a set of little felt animals to play with. When they visit here hiding my little felt animals (left over from teaching kindergarten years ago) is one of their favorite games.

So after my detours into new knitting and sewing (hats, neck warmers, table topper and animals) I'm back to trying to finish up old projects. Last year I made a part of a quilt top with pinwheels and 4 x 4's. It was only big enough for the surface of the bed and still needs sides and foot added. It was entirely scrappy, except for the white background, so I wanted to do the rest of it scrappy also.

I started on some 12" squares made up of already trimmed 2"squares from my bin. First I thought I'd like all dark, not wanting to put the white background on the sides, but soon realized that would be too dark. Then I made a few light plus dark squares, and finally decided to alternate them on the sides and foot of the quilt. There will be a red border around the top and the sides, so I'll have to buy some red yardage.

I need to make at least 38 of these 12" squares to fill in the sides and foot, and I'm finding this daunting. These eight are finished, and I'm getting a little better organized on how to put them together. But this is not going to be a quick finish!

Sunday, February 6, 2011

At Last!!!

At last, a day suitable for a walk! We've had so much cold weather this winter, and a walk down a country road at -27ºC just doesn't appeal. This afternoon our thermometer read -10º and there wasn't much wind. Although the sky was overcast, the cloud cover was thin enough that you could see the sun dimly shining through. I've been getting worried about this lack of walking, especially as the wilderness hiking/camping trip to Torres Del Paine draws closer, just over six weeks from now.

So I bundled up and loaded the back pack, borrowed from a friend, with both my ankle weights, for a total of 20 lbs. I intended to hike the hill, but that road looked pretty slippery, so once I reached the corner 3/4 mile up a gentle hill from our driveway I turned east and walked that mile to the highway and back again.

At first the weight bothered my shoulders, but I adjusted the pack a bit and it wasn't too bad. By the time I got home again I was used to it. I also think that a back pack stuffed with clothing, etc, will not carry the same as one loaded with 20 1-pound metal rods, bumping around behind my butt.

I was aiming to do the 3 1/2 miles in an hour and 10 minutes, but made it in and hour and five minutes, so I was pretty happy with that. Unloaded, my pace is a steady 16 minute mile. So I'm glad to be back in training and surely hope that the weather stays decent enough for this to be regular.

On another note, the handquilted panel I
"guestimated" as a one week project, will
surely turn out to be at least twice that. Originally I thought to just quilt the outlines of the design, but later realized that those stretches of background need to be held down, especially since I'm using a polyester batt, for softness and weightlessness. I've decided to follow every other line of polka dots, and to do it on an angle to give a little motion to the design. So far, so good!

Thursday, February 3, 2011

New Project

Immediately after taking the last stitch in the "Red Square" quilt, I picked up this panel from the pile of possible projects, put together a backing of flannel squares and laid it out on the floor of the sewing room.

I wasn't going to start new projects, but after completing two UFO's, couldn't resist the urge to do something different. This was on top of the pile, so this is it!

The backing and the batting are pinned to the rug with "T" pins and the panel smoothed over top
of them. Then, on hands and knees, or sitting "side saddle" I baste them together with long stitches in approximately 6" to 8" rows. That takes a while, and also some endurance!

Then the quilt sandwich goes onto the Q Snap frame, a really handy quilting frame. I set this in the living room beside the south window, and begin to hand quilt along the outlines of the design.

Hand quilting is a uniquely calming activity. I think it's the regular, steady motion of pushing the needle down through the fabric and tipping it back up again from the underside. Once in a while you accidentally stab the finger waiting underneath to guide the needle
back up through the quilt, but not hard enough to draw blood. This is just a small quilt, so my finger won't be too "chewed" up when it's finished.

I sit with the window to my left side, so I would be on the side of the quilt opposite from this viewpoint. The quilted lines you can see are actually the basting lines. I'm thinking this is a rather small project, and hope to have it finished in about a week.

In my stash of fabric I found a good-sized piece leftover from a sundress I made in the 80's for dear daughter #2. It's just like the aqua in the lower background, which actually has little white polka dots in it. The sundress fabric is the same, just a very, very slightly darker aqua. It will make a perfect binding for this fun little quilt.

We had our regular quilting day in the country today, and have a brand new quilter joining us. She's a delightful, enthusiastic young woman, a coed at the local college. I was busy helping her get started, right down to showing her how to wind a bobbin, how to thread her machine (her sister's), etc. She's a fast learner, and was a treat as a student.

I hung the "Red Square" quilt over the stair railing and noticed something interesting. One of the fun things about this quilt is how the red squares seem to float up from the surface of the quilt. It's not as evident in the pictures as in the "flesh" but when I hung it up and looked at it from a little distance, I saw that one of the red squares doesn't float. It's the one in the middle of the picture, second row from the top, and third row from the left. The reason it doesn't float is because it has an orange square right beside it, and that pulls it down into the block. That's something I'll have to remember for future quilts. I'm pretty sure that artists are familiar with the use of colour to bring an element forward or push it back. I'd heard of that, but it still surprised me when I noticed this.