Friday, June 30, 2017

A GOOD WAY TO....

Here's a good way to control a long strip of binding while applying it to a quilt:

I've posted this some time ago, but it's such a neat trick I thought it worthwhile to repost.  After the binding is made and pressed in half, roll it up and slip it under a leg of your sewing table.  It stays put and unrolls just as needed.  Works like a charm!  And yes, that is the "Entwined" quilt all finished and being bound.  Now it just needs a label and it's ready to be given to our daughter and her husband.

I had a lot of fun yesterday: I was demonstrating Split Nine Patch blocks at the Fabric Nook, our local source for everything quilty and sewing supplies.  They had had one of my Split Nine Patch lap quilts hanging up for quite a while and had received several comments of "how is that made?"  So Brenda and I decided I would spend a day making Nine Patch blocks there, with an instructional hand-out available.  We did that yesterday.


You can see the 2' x 3' portable design board made out of rigid pink insulation and some batting.  It worked very well to keep things organized as we went along.  Here are 3 1/2 12" blocks that are finished.  Two of them have been moved to the design board above the cutting table.  I'll make 20, I think for a 4 x 5 setting.  

I cut all the 2 1/2" and 3" squares ahead of time and had them sorted by size and dark/light in four separate containers.  We had fun choosing which fabrics to use where, and the blocks seem to have turned out very nicely.

The Fabric Nook is located in the local IDA and is a very good source for quilters and home sewers.  If it were not here, we'd have to drive an hour to buy a spool of thread.  So anything I can do to help them thrive, I will!

Friday, June 23, 2017

USING A STEAM JUICER

We have two freezers, one quite large and the other medium-sized, a legacy of the days when we grew lots and lots of veggies and fruit.  We've cut way down on the amount of veggies we grow--a lot because the deer ate almost everything we grew last year.  I'm not interested in providing a buffet for the overgrown deer population!  But also because we are away part of the year now and just don't eat as much over the winter months as we used to.

The freezer in the house was the large one and held everything we were currently using, including the meat and fish we buy in "family sized trays," a good supply of frozen vegetables and all the done-ahead baking of bread, buns and muffins.  That freezer was running almost empty lately.  The freezer in the garage held the processed veggies from the garden, lots of quarts of frozen applesauce, and several ice cream pails of fruit--raspberries, cherries (two varieties), red currants, black currants and Saskatoons.

On Sunday our neighbours called and asked if we had some freezer space they could use.  Their freezer had started sparking and smoking.  The yanked it away from the wall and unplugged it.  But what to do with all the frozen food?  Fortunately I had a lot of space they could use.

I had been thinking of selling the larger freezer and using the smaller one in the house instead.  So when they came I mentioned selling the freezer.  Just what they needed!  So the deal was made.  This worked out very well for us because he would come with some of his hired men and do all the transferring.

But in the meantime the garage freezer had to be emptied, ready to come inside.  There were at least 12 gallon ice-cream pails of frozen fruits in there, so I got busy Monday morning with the steam juicer transforming the frozen fruit into fruit juice in canning jars.  That was a timely thing as our supply of canned fruit juices (all home canned) was getting low.

The Steam Juicer has four parts: a large bottom section to hold boiling water, a middle section that allows steam up through the center and has a spout to pour out the collected juice, a sieve-like upper section that holds the washed fruit, and a lid.

I've set a scalded quart jar under the spout and will drain off a quart of extremely hot juice.  Then a scalded snap lid is laid on top and the screw ring screwed on finger tight, the jar set aside to cool.  The loud snap when it seals itself is such an encouraging sound!

Here's a sieve full of Evans cherries ready to be steamed.  The colander section is on top of the lid for now, to prevent juice leaking on the counter.


Every now and then I lift up that section to see how much juice has collected.  There needs to be about 1" in the pot to fill a quart jar.

Here's the bounty so far: 19 quart jars of pure, home-made fruit juice.  At this point that's all that's in the jars.  When I use the juice I can add some sweetening, thin it with water or 7Up, make syrup for pancakes or jelly for toast.  Jim drinks some juice every day, so this will store nicely in the downstairs closet and be ready for use at any time!  No additives, no "flavourings," no aspartame, just plain good fruit juice!

Tuesday, June 20, 2017

MACHINE QUILTING

This past weekend I did finish the machine quilting.  Part of that was picking out the first two seams, the longest diagonals, because they didn't "rhyme" with the design of the quilt.  That little job took 2 hours, but was a pleasant way to spend time in the solar space with the Dear One.

Here's a close up of the wavy-line design:

This was actually quite easy and a bit of fun to do.  I used the built-in walking foot on my Janome 7700, and it went smoothly.  I wasn't at all fussy about how the lines waved, but just tried to stay about one square away from the coloured fabrics.  I did aim to go right through the intersections between the four-square parts and the one square next to them.

Here's a look at more of the quilt:

 Today I will apply the binding to the edges.  I had planned to add 2" borders, but that would make this quilt too long.  Their dog lies underneath their bed and will chew on anything that hangs down onto the floor.  As part of preventing that, I cut the corners off the bottom edge of the quilt.  That gave a pang or two!  To actually cut off something that had been carefully sewn there.


You can always click on the picture to make it bigger.  You'll see more detail that way.

Sunday, June 18, 2017

EVENING SKY

This was the peaceful scene last evening just before the sun set.
So beautiful!  The sun is just a few days away from summer solstice and is very near its northernmost point in its yearly journey.  Living with such a wide view of the western horizon has made me very aware of this yearly trip from very far south in the winter to very far north in the summer.  I think of how the ancient peoples must have looked at this phenomenon and made stories (myths) to explain the movements of the heavens.  It truly feels that the sun, moon and stars travel around the sky and the earth stays motionless at its center!

Progress on the "Entwined" quilt:  I left it on the floor since the end of May as it wasn't in the way--there's lots of room there, so I could ponder how I wanted to quilt it.  My friend Susan who has a long-arm quilting machine (she and her husband have a wholesale fabric and machine business) had often offered to let me use one and repeated her offer in regard to this 100" quilt.  I seriously considered that.  I also seriously considered hand quilting it. That would have been so nice!  But our daughter and her family will most likely visit in July, and it would have been pretty much impossible (well, totally impossible) to finish hand quilting it by then.

In the end I thought the quilting should be diagonal, following the design, and that wouldn't be suitable for the long-arm.  Once I knew what I wanted to do with it, I went ahead and spray basted it with 505.  If it were to go on the long-arm, it should not be spray basted.

Here's the process:  I cut and laid out on the rug the batting and carefully spread the backing, face up, on the batting.  When the backing was smooth and even I folded it halfway back on itself and sprayed a section, smoothed that section onto the batt, sprayed another section, repeating until the half was all spray-basted together.  Then turned around, folded the other half down and did that same.  When the batt and the backing were bonded, I turned them over so the backing was on the bottom and the batt was up.

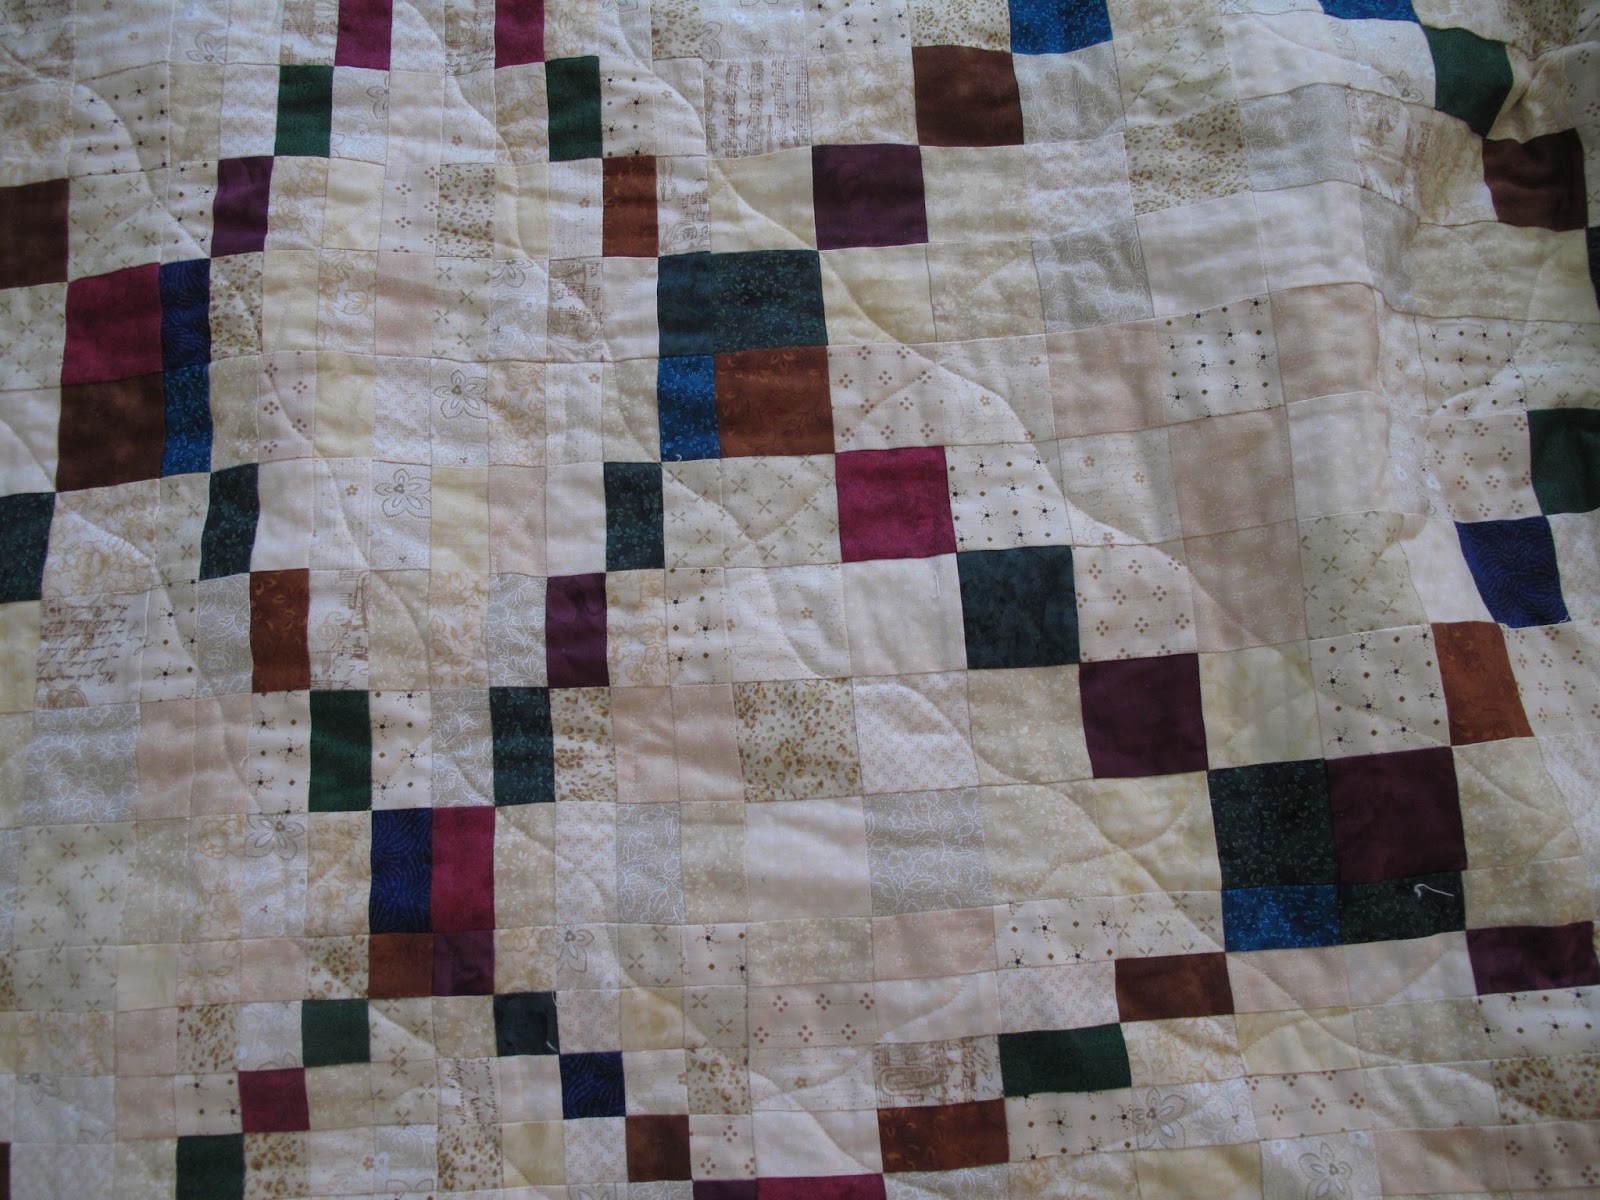
In the meantime I had spent over 2 hours carefully pressing both the back and front of the quilt top.  I spread the quilt top face up over the batt and treated it the same as the backing.  Here's a picture of the quilt top almost all bonded.

The sprayed section has been partially rolled over onto the batt.  I go down on my knees, place my hands at the middle and gently roll it over onto the batt, spreading from the middle to the sides.  When the sprayed section is smooth and glued I fold back the remaining section, spray part of that and repeat.

Because I'm doing this on the rug, I spread newspaper on either side to protect the rug from the spray glue.

The last section is ready to be sprayed here.  As I spray the edge that's over the quilt top, I move that section of newspaper to protect the right side of the quilt top.

When I laid out the blocks I was squatting or kneeling on the quilt top.  The next day I had a laugh because there definitely were some muscles running up the back of my leg to my bum that were not accustomed to being used that way and were complaining pretty loudly about it.  I forgot that until this morning when the same muscles complained in the same way about the same treatment!

I feel that quilting should reflect and enhance the quilt design.  One thing my friends and I commented on at the Red Deer Quilt Show this year was how "overquilted" many of the quilts were.  We think that detracts from the beauty of the quilt.

For this quilt it seemed that some simple lines following the meandering coloured-square lines would suit it best.  The first diagonal (the center  diagonal, of course) I sewed more or less straight through the edges of the beige sections.  When I laid it out on the floor to see how it looked, it wasn't good.  The quilt has very curvy lines and the straight lines, diagonally across each square of a block, looked completely out of place.  

The second try was to follow the same lines, about one square in from each of the coloured-block lines, with wavy lines.  Aha!  That works.  It complements the design of the quilt.

By evening about 1/3 of the machine quilting was finished.  I'll post a photo when it's completed.


Monday, June 5, 2017

A CORRECTION

Today I learned that the tornado in Friday's post was NOT about 5 miles away, it was about ONE MILE north of us.  So much for my ability to estimate distance!  We're really thankful that it didn't hit our place as our greenhouses would have perished along with whatever plants we have left to sell.

Because our house is built into a berm, we could be quite safe downstairs where the outside wall is actually under ground level.  The front of downstairs is level with the ground, and the back of upstairs is level with the ground.  So we'd just need to go into the downstairs bathroom and we'd be quite protected.

Still. . . .

Tomorrow I'm heading out to B.C. to join DS #2's family for their oldest girl's high school graduation.  This should be a very interesting visit; and it also includes a night out at Vancouver Symphony Orchestra.  What's not to like!

Friday, June 2, 2017

SCARY!

Earlier I wrote about seeing a young moose.  That was pretty exciting.  Around 5 p.m. today I saw, and photographed, something of a much larger order:


I also took a short video with the digital camera, but I can never get those videos onto the blog.  Then I grabbed the camcorder, but now I can't get that video to download to the computer.  Just not enough "smarts" here!

In this second photo you can begin to see that the funnel is beginning to pull up dirt and debris.  There's a very light tan streak running up to the tip of the funnel.  This is pretty much directly north of us.  It moved eastward, and became a much denser column of dirt flying upward.  

Judging from the radar images I would guess that this is about 5 miles north of us.  I never felt very frightened as I could see it move toward the east and we were south of it.  But I did holler to the Dear One to come inside RIGHT NOW!!!  He was out closing the greenhouses.

That's enough excitement for today, thank you!

Thursday, June 1, 2017

A LOVELY SCRAPPY QUILT

My friend Jan came for dinner and a visit on Tuesday and was kind enough to bring along her latest quilt top finish.


She had seen this idea in a quilt magazine some time ago.  She didn't have a particular colour scheme, but just started sewing scraps together into pieced triangles.  One very good idea was to take the same scraps and sew them into a middle border.  That really finishes the quilt.  The background is a slightly yellowish white.  Stark white would not have worked so well.

This close up shows how she made the triangles from all odds and ends.  Didn't matter what colour or fabric, or how wide a strip was.  Everything could be used and was.

I think this is a really cheerful quilt.  It takes restraint to not begin one just like it immediately.  Of course, there are all sorts of variations you could run on this.  Sounds like a good idea for a rainy day--just haul out the scrap bag and begin sewing strips together.  I've seen this done on telephone book pages, cut to, say, 6 1/2" by 6 1/2".  What an appealing idea!