Monday, May 29, 2017

THE TOP IS FINISHED!

My goal was to complete the quilt top last week, but there were two non-sewing days, due to other duties taking over.  But I was able to work on it this weekend and just about 20 minutes ago I finished the last seam in the top.  The top is all together!

Here's a little recap:  The first step is to cut 2 1/2" (or 1 1/2") strips the width of the material.  Sew one coloured strip to 4 beige strips.  Make vertical cuts in this strip set into 2 1/2" strips (or 1 1/2" strips).  Arrange them as show in the bottom right side of this photo. Snip each strip apart and sew back together in such a way that the coloured square moves from the upper left to the lower right, or vice versa.
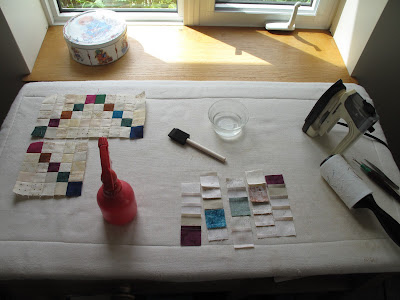
When you have four blocks, two ascending and two descending, sew them together in the arrangement shown.  For half of this new block press the seams toward the center, for the other half press the seams outward from the center.  When you sew the two halves together, you can open the intersection in the back allowing one half the seam to be pressed down and the other half of the seam to be pressed up.  Carefully pressing all the blocks in the pattern means that when you sew the quilt together, ALL THE SEAMS WILL NEST!!!  Nesting is important as it allows your points to be precisely together.


This shows the back of all the blocks arranged on the floor, prior to putting the top together.  See how all the seams go in certain directions?


Now the quilt is ready for the blocks to be sewn together.  In order to do that they all needed to be turned right-side up again.  Pick up the blocks on the second-from-the-left vertical row and place them right sides together on top of the blocks in the first, left vertical row.  Take them to the sewing machine and sew the right hand edges together.  Do not snip the thread between the blocks.  Repeat that with every two rows.  Then go through that same process with your new double, vertical rows.  By repeating this process, eventually you will have the entire quilt top sewed together, and none of the blocks will have moved "out of place."


It's not so obvious from the photo, but seeing the whole quilt together makes me realize that the proper colour for a border is brown.  Tomorrow I'll go to the Fabric Nook and see if they still have any of the brown fabric that is already in this quilt.  There are always other options, but I'm pretty sure brown is the way to go.

I'm still delighted with this quilt.  It's SO DIFFERENT!  My friend Susan has a long arm Quinique sewing machine and frame and she has offered to let me quilt it on that.  I'm not sure that's what will happen, because I want the quilting to enhance the quilt, not detract from this unusual design.  I'll keep you posted!

AN UNUSUAL SIGHT

I was relaxing in the living room this morning, enjoying my first cup of coffee.  I could hear a train approaching--a railway line borders our property.  This train was heading south, and that means they blare their warning while right at the eastern edge of our property.  Suddenly there was a blur of brown visible through the south window.  It couldn't be a deer--they never run that fast here, being perfectly used to hearing trains go by, and not at all frightened of people.  In fact, it's hard to get them to leave.

So I looked out the west window to see what it was.  A big surprise!  It was a young moose!  When we first lived here Jim did see a moose on our acreage once, but we've never seen any since.

It was really kind of neat to see that young moose hurrying down the driveway to get away from whatever awful beast had made that loud noise.  Fortunately for the moose there was no traffic on the road, and he jogged across into the neighbour's fields.

Too bad there's no picture, but I should keep the camera handy, in case there's another sighting of this new neighbour.

Tuesday, May 23, 2017

TOO MANY DEER!!!

Jim had fun planting flowers in some pots on the back patio yesterday.  This morning, not so nice:

In spite of trying to protect a rather large fuschia on top of the pot and some blooming pansies in the side bumps, the deer did eat them last night.  This pot is about 5 feet from our back door.  SHAMELESS!!!

I hardly dared to plant out the "greenhouse" corn that I raised in pots in the greenhouse to this point.  I took this picture to show how nice it is today, just planted out.  We'll see if they leave it alone.  Last year when it was small and tender, they did dine on it.  Once it grew and became more coarse they left it alone, and we did harvest some corn.

I try to scare them away when I see them grazing in the landscape or garden beds.  They've even invaded the greenhouses and grazed on the pots and four- and six-packs waiting to be sold.  The perennials are out on shelves outside and they regularly graze on them.  There are said to be lots of ways to deter deer, but the one that does work is having a dog.  Unfortunately, we can't do that, because we do leave for a vacation in the off season.  Some poor dog would perish from loneliness.  I can't do that do an animal.  But I have a hard heart toward deer.  I won't even say what I would do to them if I could!

Sunday, May 21, 2017

SEVEN TO GO

There hasn't been much time for sewing lately because the Garden Centre is, finally, becoming quite busy.  That's wonderful as it's past the middle of May and we'd like to sell the plants we raised!

But yesterday I did sew one block of the Entwined quilt.  Today, a very quiet day, I finished three blocks.  I was quite sure of how many, and what size blocks were still needed, but thought it was a good idea to check by laying out the blocks as they will be used.
The seven blocks that are needed are a repeat of the very left-hand column, and they would be placed on the right side of the quilt. These blocks are simply laid out on the floor just touching, not sewed together yet.

I guess there will be a small border of red, then perhaps some beige and a final binding, probably also red.  These will be auditioned to see if they look right.

I still really like this quilt.  I love how it looks as if it's bent here and there, even though it is flat on the floor.  But I'm really bored of sewing the same block over and over.  I need a lot of self-restraint not to branch off into some other project.  However, this quilt really needs to be complete by July so it can go home with D.D. and D.S.iL.  Shipping a large quilt would be prohibitive!

Another possible project came along this past week.  In 1990 I knit a lovely, pure wool sweater for the Dear One.  Over the years I reknit the cuffs (twice) and knit patches for the worn-out elbows.  That sweater is beyond a simple fix now.  I thought maybe I could take it apart and reuse some of the wool, combine it with a plain brown wool, and create another good sweater.  BUT when I tried to take it apart, it was apparent that was not going to work.  Here's the sweater being unravelled onto the ball winder:
At bit later it was apparent that I wouldn't be able to salvage much from this old favourite.  It went into the garbage bin.  Sniff, sniff....

Another project that was completed this week is the Portable Design Board.  In the last part of June I will be doing a "demo" at the Fabric Nook on the Split Nine Patch block.  I've had a Split Nine Patch hanging there for a few months and Brenda said there have been many inquiries about how to make that block, so we agreed that I'd do a day of demo.  A 2' x 3' design board will be very helpful with this, so I made one.

There was a remnant of pink, rigid insulation in the workshop that was just right for this.  I sawed off a section, 2' x 3'.  It was pretty dirty, so I washed it up in the bathtub, dried it and covered it with some old bits of polyester batting.

I covered that with a big piece of new, Warm and Natural batting, which I folded over to the back side and sealed with fusible batting seam tape.  
It's all ready to go.  All that needs to be completed yet is a set of directions for making Split Nine Patch blocks.


Wednesday, May 17, 2017

STUMPOT

Today is overcast and cold.  Not very good Garden Centre weather.  But just right for a Dutch dish that I learned by trial and error from my Dear One, born in The Netherlands.  I had never encountered this growing up--my parents were first generation Americans, born to Dutch immigrant parents, and this wonderful dish for cold, damp days did not come down to me.  But here is my recipe, evolved from several "failed" attempts to imitate what Jim grew up with:

STUMPOT
Peel and cook an appropriate amount of potatoes (for how many people will be eating).
(Today I'm cooking just two very large Red Norlands.  I peel them,  cut them up and bring them to a boil.  Put on the lid and leave them in the hot water for an hour or two.  They're cooked just right that way.)
Cut up onion and sauté it.
Cut up sausage or ham (I like Mild Italian Sausage for this.) and cook in the onion pan.
Wilt Swiss Chard or spinach, drain and cut up very fine.

Heat up the potatoes, drain and mash.
Mix all the ingredients together, season with salt and pepper (a bit of nutmeg would also go well)and "anoint" with (lots of) butter.

Makes a hearty, satisfying meal on a cold, damp day.

We'll add some fresh, cut-up tomatoes on the side, or maybe some homemade applesauce.


The applesauce looks a little chunky here because it's not completely thawed.

Mentioning the nutmeg reminded me of my friend Connie who married a Dutch immigrant a few years before I married my Dutch immigrant.  Connie commented on Dutch cooking: They add some nutmeg to the boiled green beans and think they're really cooking with spices!  I still chuckle about that.

Jim opened the greenhouse doors a bit after 9 a.m. this morning, and maybe an hour later a lone customer showed up.  When Jim got out there, the woman told him that there had been a deer in the greenhouse when she first walked in.  It must have been a young one, as a mature deer would be very leery of being in an enclosed space.  I hope she gave it a good scare!

We can't grow a vegetable garden here anymore.  There is a herd of six deer that live south of the greenhouse in some brush around the dugout, and on the east side of the railroad that marks the east end of our property there is a herd of about 12 deer.  I wouldn't mind sharing with one or two deer, but when you have 18 eating from your landscape and garden you become VERY discouraged!  When they invade the plants at the garden centre and even those in the greenhouse, I just get really mad!  They know they're safe here because they cannot be shot this close to town.  Why can't there be a cull of this terrible nuisance? 
A pot of spinach pretty much eaten up.

My "indoor" garden, which I thought was safe from deer depredations:

The corn and the acorn squash will be planted out in the raised garden beds, as maybe the deer do not care for those plants!

Sunday, May 14, 2017

P.S.

Something I meant to mention when talking about those two yarn socks.  This works especially well when you are knitting a two round pattern.  Yarn A is always a pattern round and yarn B is always a plain round.  Usually this is easy to see anyway, but A and B make it extra clear.

ONE SOCK, TWO YARNS

Some years ago I was given two balls of sock yarn--not matching at all, except for one blue colour they had in common.  Since a 50g ball of sock yarn can make one adult-sized sock, I decided to somehow combine them.  I looked up ways to make stripes, but wasn't happy with any of them, so I came up with my own method.   And found this works like a charm.
I haven't tried this with top-down socks, since the last many years I knit only toe-up socks.  Here's how: start the toe in the usual manner with Judy Becker's Magic Cast On.  After two or three rounds with yarn A, knit the first three needles of the next round with yarn A.  Now go back to the first needle and with yarn B knit needles #1 and #2.  Drop that yarn, turn the sock and pick up yarn A and knit needles #4 and #1.  Now drop that yarn, turn the sock back, pick up yarn B and knit needles #3 and #4.  Keep alternating between yarns.  They will follow each other around the sock with "joins" or "jogs".  

You can combine really odd balls of yarn in this manner and they will produce interesting socks.  

You can actually combine three separate balls of different colours in this manner.  In that case you would begin the same way with yarn A, knitting needles #1, 2 and 3.  With yarn B you would knit needles #1 and 2.  With yarn C you knit just needle #1.  Now go back to yarn A and knit #4, and begin chasing the colours around the sock.  With three balls you will knit just one needle at a time before turning the sock back to pick up the next colour yarn.

I presume you could knit really varicoloured socks by combining all odd bits of yarn.  But a suggestion: weave the ends in as you go so you don't have a whole whack of ends to weave in when the sock is finished.

The other handy dandy tip is to use one of those delightful zippered plastic bags that a new pair of pillowcases or a valance comes in.  Your yarn with stay put and not get tangled, that is, if you turn the sock back and forth and not just rotate in one direction.  A friend in Arizona gave me several of these handy bags.

What's also helping here is that I have a "Ball Winder."  This nifty gadget takes a skein of yarn, or a ball of commercial yarn,  and rewinds it so that it has a flat bottom and top and feeds nicely from the center of the ball.

This week L. did seed the field across the road and one morning before breakfast I was able to run out and snap this picture of the seeder:
This is a tractor with actual "tracks" not wheels.  A little hard to see in this picture, but if you click on the picture you should get an enlarged version.  His other seeder, the red one, has two sets of tracks on each side and is MUCH more impressive.  The red unit behind this tractor is the unit that actually put the seed in the ground.  Following it is the wagon with many compartments that holds the seed and fertilizers.  Under the red unit are the "tongs" (I don't know the exact name) that make a small furrow into which the seed is planted.  Coming down on either side are the "conduits" for fertilizer.  There could be more than one type of fertilizer deposited with the seed: one right close by to get it started and others a bit farther away for later growth.

These tractors are very smart--equipped with fancy computers and GPS.  This computer can be shown the field, either by driving the unit around the perimeter of the field, or simply from a "memory stick" that tells the tractor the exact layout of the field.  You have a choice: you can turn the tractor yourself at the end of the row or you can let the program do it.  GPS is so precise that you can seed in between the rows that you planted in that field last year!

Nowadays you need to know a LOT to be a farmer.  You have to be savvy about machinery, with computers and in terms of business.  Not what I thought when I was a young wife and, temporarily angry with the dear one, stamped my foot and said, YOU DUMB FARMER!  Totally inappropriate even then!  And more so now. 

We are finally seeing some of the delights of spring here:
The forsythia out front is blooming the best it ever has--all the way to the top of the stems.

The spurge throughout that garden has also begun blooming--another bright yellow, and the various fruits are blooming also: Nanking cherry, Double Flowering Plum and Muckle Plum.  How cheerful!  Here's the Double Flowering Plum
This is the Muckle Plum:

And these are part of the row of Nanking Cherries.  Behind them are a few pear trees which have also started to bloom.

 
These pictures don't really capture the beauty of these flowering shrubs.  To see them in person is so much better!